
The importance of photorealism has increased dramatically with the digitization of our world. What started as an art movement in the late 1960s has now found its way into gaming, architecture, film, automotive, and more. Of course, we’re not talking photorealistic paintings or drawings here. We’re talking about photorealistic renders: computer-generated imagery (CGI) that emulates reality as closely as possible.

Before CGI, companies had to hire a bunch of photographers who all had to travel to the set and photograph all the assets that the company had painstakingly prepared. Not only was this expensive, but companies were also limited in what they do could do to portray those assets. Top-down pictures of a new airplane in flight? Impossible. Driving car with explosions in the background? Preferably not. Companies also couldn’t easily change those pictures once the photographers were done with them. If you wanted a different angle after the pictures had been taken, you’d need to go through the entire process again.
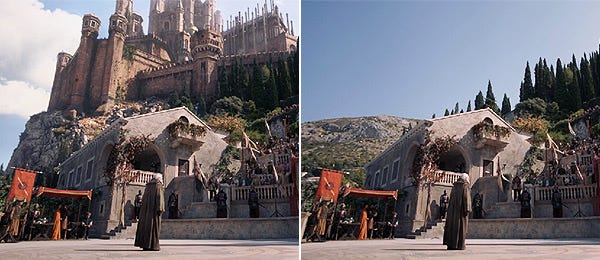
CGI solves all those problems. Considering CG renders are created from scratch on a computer, it’s much less costly and much more flexible. Once the 3D model is done, you can place it in any scenario and adjust it as you please without it costing too much money or time. It’s the reason why 75% of the IKEA catalog is CGI. It’s why Hollywood replaces entire movie sets with CGI. It’s why nearly every architecture company uses architectural renders to promote yet-to-be-built property.
Photorealistic VR is considered the next Holy Grail of computing by the people at NVIDIA. Creating VR in itself is already a daunting task. First of all, it’s daunting for computational reasons, because your GPU needs to compute everything twice (once per eye), but it’s also daunting for something called the uncanny valley.
Ever looked at an image of something that almost looks like a person, but doesn’t quite? An image that seems to have everything to classify it as human, but with something missing. You can’t quite put your finger on what it is, but it is there and it gives you the creeps. That’s the uncanny valley. This can happen with realistic CGI, but also with robots and even with prosthetic limbs.
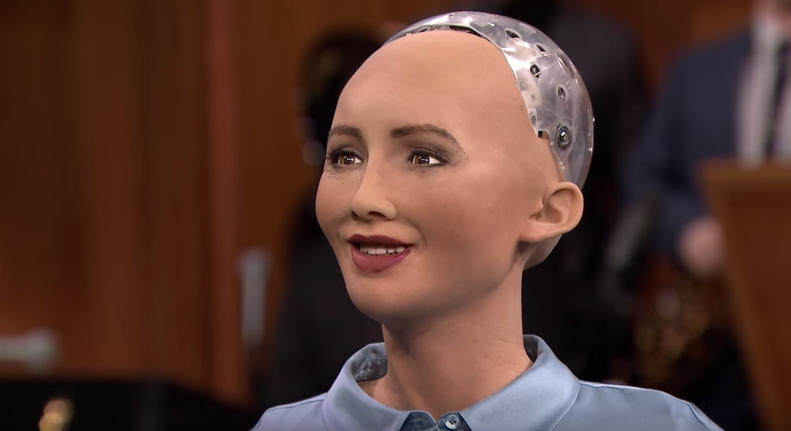
Considering the main differentiator between VR and other platforms is how much more VR immerses you into its world, many VR games risk falling into a portrayal of reality where particularly the characters give VR users a feeling that something isn’t quite right. And that breaks immersion.
Of course, this can’t and won’t stop companies and artists from pushing the boundaries towards increasingly realistic CGI. And 3D artists have become incredibly good at crafting photorealistic CGI already. In fact, for still images, it’s become nigh impossible to tell whether something is a render or a picture.

How to Achieve Photorealism?
The question is: how do they do it? How does an artist turn what’s essentially an empty file into an image that’s indistinguishable from reality? Technically, the answer is math. Photorealistic CGI happens because of geometry, 3D coordinates, vectors, matrices, algorithms, and many other sorts of funky mathematical concepts.
But that’s what happens underneath the hood. A 3D artist creates a photorealistic image mainly by going through four main steps, as explained by Andrew Price on his YouTube channel Blender Guru, with each step building on the previous step. The four steps are:
- Modeling
- Materials
- Lighting
- Post-Processing
While 3D artists need to lovingly recreate reality at each step, they’re likely to spend the bulk of their time on materials and lighting to get to a photorealistic image. This is particularly the case if there are no characters in the image. If there are characters in the image, they’re likely to spend a good amount of time on modeling too, because people are quite adept at detecting flaws in characters.
Photorealistic Modeling
This is the foundation. Where you go from a blank image to a model that resembles reality as closely as possible. With photorealistic modeling, you’ll want to recreate the exact proportion and form of the object you’re modeling. If you get this wrong, your image will never look photorealistic.
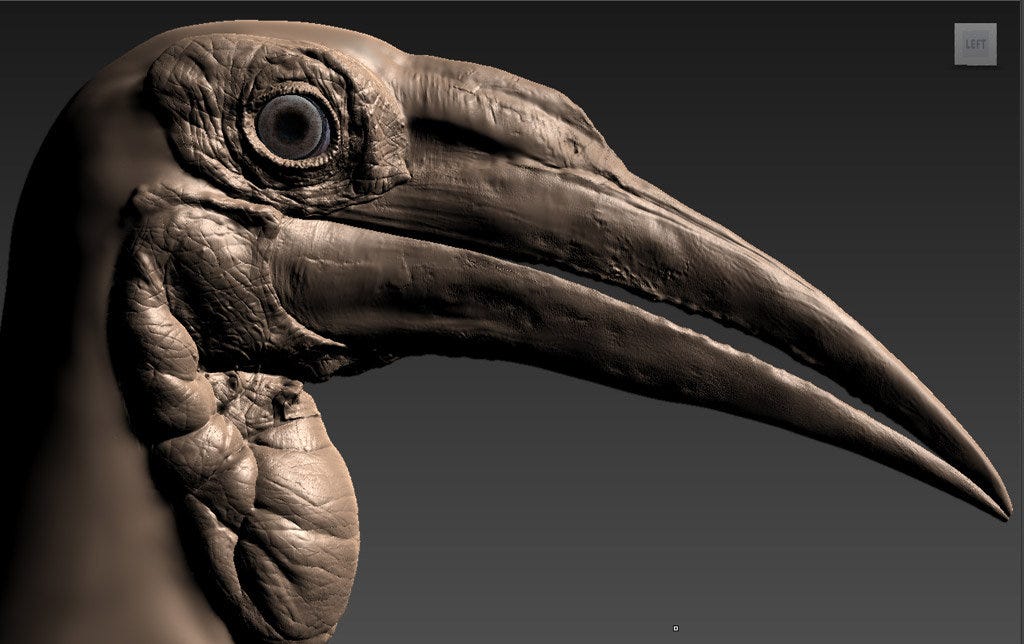
In this step, it’s important to use real-world units to define the proportions of your model. Don’t try to scale by eye. If you think you know the height of that water bottle or the diameter of your cup of coffee, you’re likely wrong. Not entirely, of course, but wrong enough to make the image as a whole look wrong. In the ideal scenario, you’d want to use the real-world reference, because you’re sure to pick up details with the real-world object that you would’ve missed by just looking at pictures online.
Additionally, never use a sharp edge. After all, nothing in nature comes at a 90° angle. Everything has some curvature and smoothness (even a razor). But the computer world is a cold, harsh world, where everything has sharp angles by default. So use your bevel tool to round those edges.
Photorealistic Materials
Next, you need to match the shading and the texture of the real-world object. For some objects, this is easier than for others. A metal wall panel is easier than a fat fish. But every object has its own quirks that you’ll need to emulate for a photorealistic image.

More specifically, you’ll want to look at the variance and the imperfections of the object you’re creating. Nothing is ever entirely perfect. A white table is never entirely white, never entirely flat. It has a coffee ring, a few chips off here and there, some dirt, some shades in its color. These imperfections need to be added to your image to make it look like the real deal.
Photorealistic Lighting
This is where the magic happens. This is where the transition from realistic to photorealistic occurs. Accurately rendering light is incredibly difficult, both computationally and for the 3D artist. Over the course of many decades, technology has moved from using rasterization to ray casting to now ray tracing to accurately emulate real-world light.
We’ve explained lighting in computer graphics in a different blog post before, but suffice to say that it requires your computer to draw millions and millions of rays that bounce off the objects it encounters to accurately portray light.

Photorealistic lighting has to match the color, direction, and intensity of the light seen in real life. Light bounces off of everything, and that must be reflected (no pun intended) in your image. Think about reflections too, as every object has some level of reflectivity.
Photorealistic Post-Processing
This step usually doesn’t take up much time, but it’s important nonetheless. Photorealistic post-processing is all about recreating the imperfections from real-life cameras, because we don’t want the perfect images that the computer gives us. We want real life, warts and all.

In the above image, the post-processing effect that’s most noticeable is depth of field. A camera lens physically cannot get everything in focus all at once. So your image needs to have at least some depth of field to realistically portray the image as if it were taken by a camera.
Other post-processing effects that you should add to reflect the imperfections of a camera are lens glare, motion blur, barrel distortion (to reflect the curvature of the lens) and sometimes chromatic aberration (the blurry red or blue fringe where dark meets light, often in images taken by a cheap lens).
What Does This Mean for VR?
Photorealistic VR will heavily depend on our ability to not just create a single photorealistic image, but photorealistic environments that the player can walk around in and that the player can interact with, at a motion-to-photon latency that almost perfectly synced with the head and limb movements of the user in real life.
GPUs such as the RTX 2080Ti, which supports real-time ray tracing, are a big step in the right direction, but there’s a long way to go still. Nonetheless, VR graphics have made significant progress over the last decade and will continue to improve until we arrive at the Holy Grail of photorealistic graphics.
In a few decades, we’ll be able to walk around in a digital world that looks exactly like the real world. Kinda like the Matrix, except hopefully without machines using that photorealistic simulation to have us believe it’s reality while they breed and eat us.