Here we walk through the development of a new hand posing system built during the internship of Viktor at OneBonsai. It covers experimenting with Control Rigs, designing intuitive finger controls, and building a tool that lets artists quickly pose hands around objects and save those poses as reusable animations.
Mid-February I started as a Tool Developer Intern at OneBonsai, and on my first day I was immediately handed my first task:
rework the existing hand posing system.
The previous system technically worked, but it had a few major issues. It was cumbersome to use and often produced strange or unnatural poses. My job was to redesign it so it would be easier to use while also improving how poses are stored and reused.
This kicked off a process of experimenting with different approaches, learning new systems inside Unreal, and slowly building something that felt intuitive for artists and developers alike.
Control Rigs
While exploring ways to manipulate skeletal meshes, I ran into Control Rigs.
As a developer, I had never worked with them before, but it quickly became obvious how powerful they could be. That made them a natural candidate for driving the new hand posing system.
So I started experimenting.
The First Control Rig
My first attempt was essentially a recreation of the old system, but implemented using a Control Rig.
The idea was simple:
- Define target positions for fingers
- Use inverse kinematics (IK) to move the fingers to those targets
- Add controls to adjust finger roll

Technically, it worked.
But the finger roll controls were quite abstract. If you only looked at the control nodes, it was hard to predict what the resulting pose would look like. You had to rely heavily on visual feedback from the hand itself.
That wasn't ideal.
So after gaining a better understanding of Control Rigs, I decided to start over.
Control Rig 2: Electric Boogaloo
This time I approached the problem differently.
Instead of recreating the old system, I asked a more basic question:
What controls are actually needed to create most hand poses?
The answer ended up being surprisingly simple.
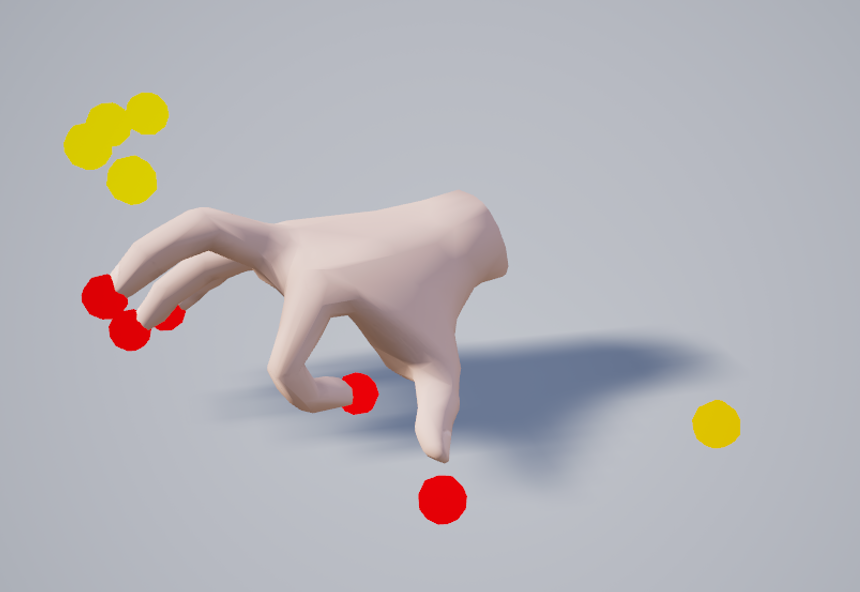
Each finger received:
- A scalar value to control curling
- A rotatable control node at the base joint
This setup turned out to be much more intuitive.
The rotatable base joints were especially useful because they allowed me to limit their motion, making it far harder to create physically impossible poses.
That alone already made the system significantly easier to use.
Control Rig 2 (Again), But Better
With the core controls in place, I started focusing on quality-of-life improvements.
One suggestion from my supervisor was particularly interesting:
What if the hand could automatically try to close around objects?
It turned out this was fairly straightforward to implement — and incredibly useful in practice.
Instead of manually posing every finger from scratch, the system can now automatically wrap the hand around an object, getting you most of the way there. After that, you only need to make small tweaks to finalize the pose.
This feature quickly became one of the most satisfying parts of the system.
The Actual Posing Tool
Having a Control Rig that can pose hands around objects is great.
But to make it truly useful in production, we also need tooling to:
- Spawn the hand rig in the correct position
- Define how objects are grabbed
- Save the resulting pose for later use
So the next step was building the actual hand posing tool around the rig.
Making Objects Grabbable
First, objects needed a way to describe how they should be held.
For this, I created a box component that stores:
- An animation sequence representing the pose
- A transform that determines how the object sits in the hand
- A state describing the interaction type:
- Holding
- Using
- Approaching
This component effectively turns any object into something the system knows how to grab.
Spawning the Control Rig
Next, the tool needs to place the hand correctly.
A tools handler actor keeps a reference to a grabbable object that contains the grab point component. When the user presses the spawn button, the Control Rig hand is spawned at the grab point location.
This ensures the hand always starts in the correct position relative to the object.
Saving the Pose
This part turned out to be the biggest challenge of the entire project.
The goal was to take the current hand pose and store it as an animation sequence.
The solution ended up being a custom C++ function that:
- Reads the current transform of every bone in a skeletal mesh
- Writes those transforms into a single-frame animation sequence
In other words, the system captures the exact pose of the hand and saves it as an animation.
Alongside that animation, we also store the relative transform between the object and the hand, allowing objects to snap into the correct position later.
Saving Data to the Object
Once the pose data exists, it needs to be stored on the object itself.
To do this, I used Unreal’s Class Default Object (CDO) system, which allows you to modify and save default values in C++.
It took a bit of effort to get this working properly, especially when the grab point component lives in parent classes of the grabbable object. But after some adjustments the system became flexible enough to support those cases.
Using the New Poses
Once poses were saved, the final step was making sure the runtime system could actually use them.
Fortunately, this part was fairly similar to the previous implementation. I was able to reuse parts of the old system and modify them to work with the new pose data.
Finally, I updated the interaction system so it prefers the new hand poses over the legacy ones.
With that in place, the new pipeline was complete.
Result
The result is a much easier hand posing tool.
It still needs some polishing, but it’s already significantly more usable than the previous system — both when creating poses and when applying them in-game.
And most importantly, it produces much more natural-looking hand poses.